


How do I boost pressure in a reverse osmosis system?
 What is the perfect water pressure for my RO?
Most revers osmosis membranes are designed to work with 60 PSI or higher water pressure, where they are tested to yield a stable rejection rate of at least 97.5%. If the water pressure feeding an RO system is less than that, the system will produce less water and at a lower quality. Additionally, production is reduced whenever the water temperature is below 77 °F. Private well systems most commonly have pressurized storage tank and pump systems with 20/40 psi or 30/50 psi on/off pressure settings. In such cases an electric pressure boosting pump must be installed to provide adequate rejection of specific health-related contaminants in the feedwater, such as nitrate or arsenic and others specified by the US EPA or local regulations.
What if I connect my ice maker?
RO water will produce cleaner ice cubes because of the purity of frozen water. So, connecting your RO to the ice maker makes a lot of sense. However, new ice makers require 30-40 PSI incoming water pressure to function properly. You may not have enough pressure at the pressurized water tank since your RO cuts the line pressure by 30-35%.
How can I increase water pressure?
We will discuss several ways to boost the pressure coming out from your cold-water line to run the RO.
Boosting Pressure Using a Permeate Pump

Permeate pumps use the energy of drain water flow from reverse osmosis system as leverage to push the purified water into the holding tank. Aquatec, the manufacturer of ERP-1000 permeate pump states that these pumps dramatically improve the efficiency of reverse osmosis water (RO) production, reducing wastewater by up to 80%. Permeate pumps can easily be retrofitted to upgrade existing RO systems.
Flow Diagram #1

Boosting Pressure using an Electric Booster Pump

Adding an electric booster pump increases the RO production rate, boosts the pressure tank storage volume, rejects more contaminants and increases faucet flow rate even if the reverse osmosis membrane pressure rating is met by the water supply. Residnetial RO systems work with diaphragm booster pumps that will typically increase the feed pressure upto 75-100 PSI.
Install the pump directly in the RO feed line (see diagrams below) following these guidelines.
- A sediment filter should always protect the pump large particulate matter in water. If the design permits, install the pump between the sediment filter and carbon filter since carbon filters before the pump may become too restrictive of the water flow and starve the pump.
- Pumps must be mounted following suppliers recommendation. Mounting orientations such as pump vertical with head down may encourage air-locking, leading to pressure loss.
- Mount the high pressure switch (tank switch) as closest to the tank as possible to avoid cycling of pump by reacting to the pressure drop in the tubing when the drinking water faucet is opened.
- Flow of water through the pump is indicated by an arrow. Be sure you insert the tubing correctly.
- If the boosted pressure is too high (typically >100 PSI), the RO fittings and housings can develop leaks. There is a top adjustment screw on the pump head that can be used to lower the pressure.
What is the perfect water pressure for my RO?
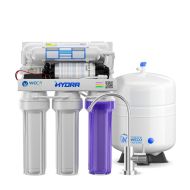
An electric booster pump kit such as FC-1400 can very efficienty boost the line pressure up to 80 PSI. This simple low-cost setup is the most commonly used design in residential reverse osmosis industry. A differential pressure controlled automatic shut off device (ASO valve) and a high-pressure switch controlls the pump and water flow into the membrane. When the tank pressure gets up to 60% of the incoming pressure the valve internally closes off the inlet. This will build up pressure on the high-pressure switch.
FC-1400 kit includes a 1/4" quick connect ASO valve, pump, transformer and a high-pressure switch for RO systems upto 50 GPD.
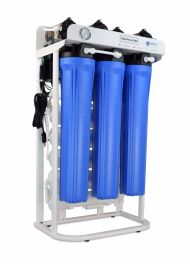
FC-3800 kit includes a 3/8" quick connect ASO valve, pump, transformer and a high-pressure switch for RO systems upto 100 GPD.
Flow Diagram #2

Internal Plumbing - Design 2 Using Solenoid
Flow Diagram #3

Easy External Plumbing - Design 3
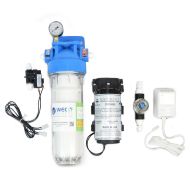
Design below requires no internal plumbing modifications on your RO system. Simply mount the booster pump between the water supply and the RO. A high pressure switch will mount on the pressurized storage tank tubing. This pressure switch cuts off power to the pump when the water storage tank reaches 40 PSI (or rated pre set pressure of the switch).
Our economy pump retrofit kits ECON-50P utilize this design. Premium retrofit kit GYC-1400 also includes a pressure gauge system with a pre-filter pressure stabilizer as well as a strainer to protect the pump from sediment. Video below illustrates installing of the premium kit.
Flow Diagram #4

In certain instances, relying solely on a RO booster pump may prove insufficient to achieve the desired water pressure. Additional scenarios that necessitate supplementary equipment include:
- Basement-installed Drinking Water RO Systems. Purified water needs to ascend multiple floors to reach the RO faucet or ice makers.
- Special Refrigerators/Ice Makers: Pressure sensors in specific appliances cut off water supply if purified water pressure falls below a certain threshold (e.g., 45 PSI).
- High Water Usage Equipment.
Recommendations for Boosting Water Pressure:
- Increase Tank Capacity: Expand the RO pressure tank capacity by adding more tanks or upgrading to larger ones. Typically, the standard size for an RO tank is likely around 4.5 gallons, providing approximately 2.8 gallons of usable capacity. RO tanks are available in a spectrum of sizes, starting from 1 gallon (with an approximate 0.5-gallon capacity) and extending up to 120 gallons (with an approximate 65-gallon capacity). Select the largest size compatible with the available space.
- Increase Membrane Capacity: Enhance the flow rate by replacing the existing reverse osmosis membrane with a higher capacity one, accompanied by a matching flow restrictor.
- Upsize Post Membrane Tubing/Fittings: Replace smaller tubing and fittings after the reverse osmosis membrane to reduce flow restrictions.
- Install a Post-RO Delivery Pump and Accumulator Tank: Consider installing a delivery pump kit, such as the DP90, to pressurize water from the RO tank up to 60 PSI, akin to regular city water pressure.
These suggestions provide holistic solutions to tackle particular challenges and improve the overall water pressure within your system.
Flow Diagram #5


Reducing down water inlet size has been used for years by residential plumbers to increase pressure.